
Wil je squares aan elkaar maken zoals hierboven? Hieronder staat het beschreven. Ik hoop dat het duidelijk is en anders hoor ik het natuurlijk graag!
Do you want to attach squares the way it is done on the picture above? Down here I've written it down. I hope the description is clear. If not, please let me know!

1. Ten eerste: maak een square en zorg dat de rand gemaakt is van vasten. Leg de squares met de goede kanten op elkaar. Dus het gedeelte wat de bovenkant van de deken of het kussen moet zijn is niet zichtbaar. De katoen die ik gebruikt heb voor deze square bestaat uit acht hele dunne draadjes. Voor het vastnaaien heb ik een stuk katoen afgeknipt en in tweeen gedeeld. Ik heb dus vier dunne draadjes gebruikt van dezelfde kleur die gebruikt is voor de rand.
1. First of all: make a square and make sure the edge is made out of single crochets. Lay the squares with the right sides on top of eachother. So the part that has to be the top of your blanket or cushion is not visible. The cotton I've used for this square is made out of eight really thin threads. For the sewing of these squares I've taken a piece of cotton and devided it in two. So I've used four small threads of the same colour that is used for the edging.

2. Ik heb de hoeken zo gemaakt dat er vier lossen zitten die samen een kleine opening zijn. Op de foto hierboven zie je waar je de naald met de draad in moet doen en waar dus die kleine opening zit. Maak de draad met een knoop vast aan de hoek.
2. I've made the corners by doing four chain stitches that make a small opening together. On the picture above you can see where the needle and the thread have to go in and so where you can find the small opening. Tie the thread to the corner with a knot.

3. Haal de draad drie keer door de kleine opening om te zorgen dat de hoek stevig vast zit.
3. Pull the thread three times through the opening to make sure the corner is attached very well.

4. Nadat je de hoek hebt gedaan, trek je de draad door de vasten van de twee squares zoals het op de foto hierboven gedaan is.
4. Now after you've done the corner, just pull the thread through the single crochet of the two squares like it is done on the picture above.

5. Let nu goed op. De draad komt vanuit de hoek, dus het komt vanuit de rechterbovenhoek van de square, dus als je de draad door de twee vasten haalt, is de draad diagonaal vanaf de hoek waar die vandaan kwam. Op de tekening hierboven staat wat ik bedoel.
5. Pay attention now: the thread is coming from the corner, so it is coming from the right corner on top of the square and so when you pull the thread through the two single crochets, the thread is a diagonal from the corner where it came from. On the picture above you can see what I mean.

6. Je haalt de draad nu nog een keer door dezelfde steken. Dat is dus een rechte lijn zoals de paarse streep hierboven.
6. Pull the thread through the same stitches ones more. So that's the straight line like the purple one above.

7. Doe de hele rand van de square op deze manier, en eindig de hoek zoals je die begon door drie keer de draad erdoor te halen.
7. Do the entire edge of the square like this, and end in the corner the way you started it by pulling the thread through it three times.

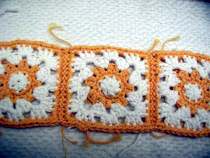
8. Als je squares aan elkaar maakt, denk er dan altijd om dat je de korte kanten van de squares eerst aan elkaar maakt zoals op het plaatje hierboven.
8. When you're attaching squares, allways make sure you attach the short sides of the squares first like it is shown on the picture above.

9. Daarna maak je de lange kanten aan elkaar zoals op het plaatje hierboven.
9. After that, you attach the long sides to eachother like it is shown on the pictures above.